OpenERP has lots of new feature and completely new user friendly UI and with viral features, I am damn sure it will rock the world of ERP.
Here following are some analysis of mine on 7.0, how it works and how everything initialized and how instance of OpenERP webclient initiated, hope you will like this.
Before going further let us see OpenERP client-server architecture, how OpenERP user, client, server and database interacts with each other., which clarify above descriptions.

I will start with starting procedure of OpenERP Server from terminal with command-line arguments, I will also describes some method call, what that method do in short description. Here I have explained the flow of server, how each job got initialized, Still these is not the perfect flow but I'll update and improve this day by day, for better understanding follow the flow with your system and "CORRECT ME" if I am wrong, please share your views for points on which you have better ideas with comment on this post.
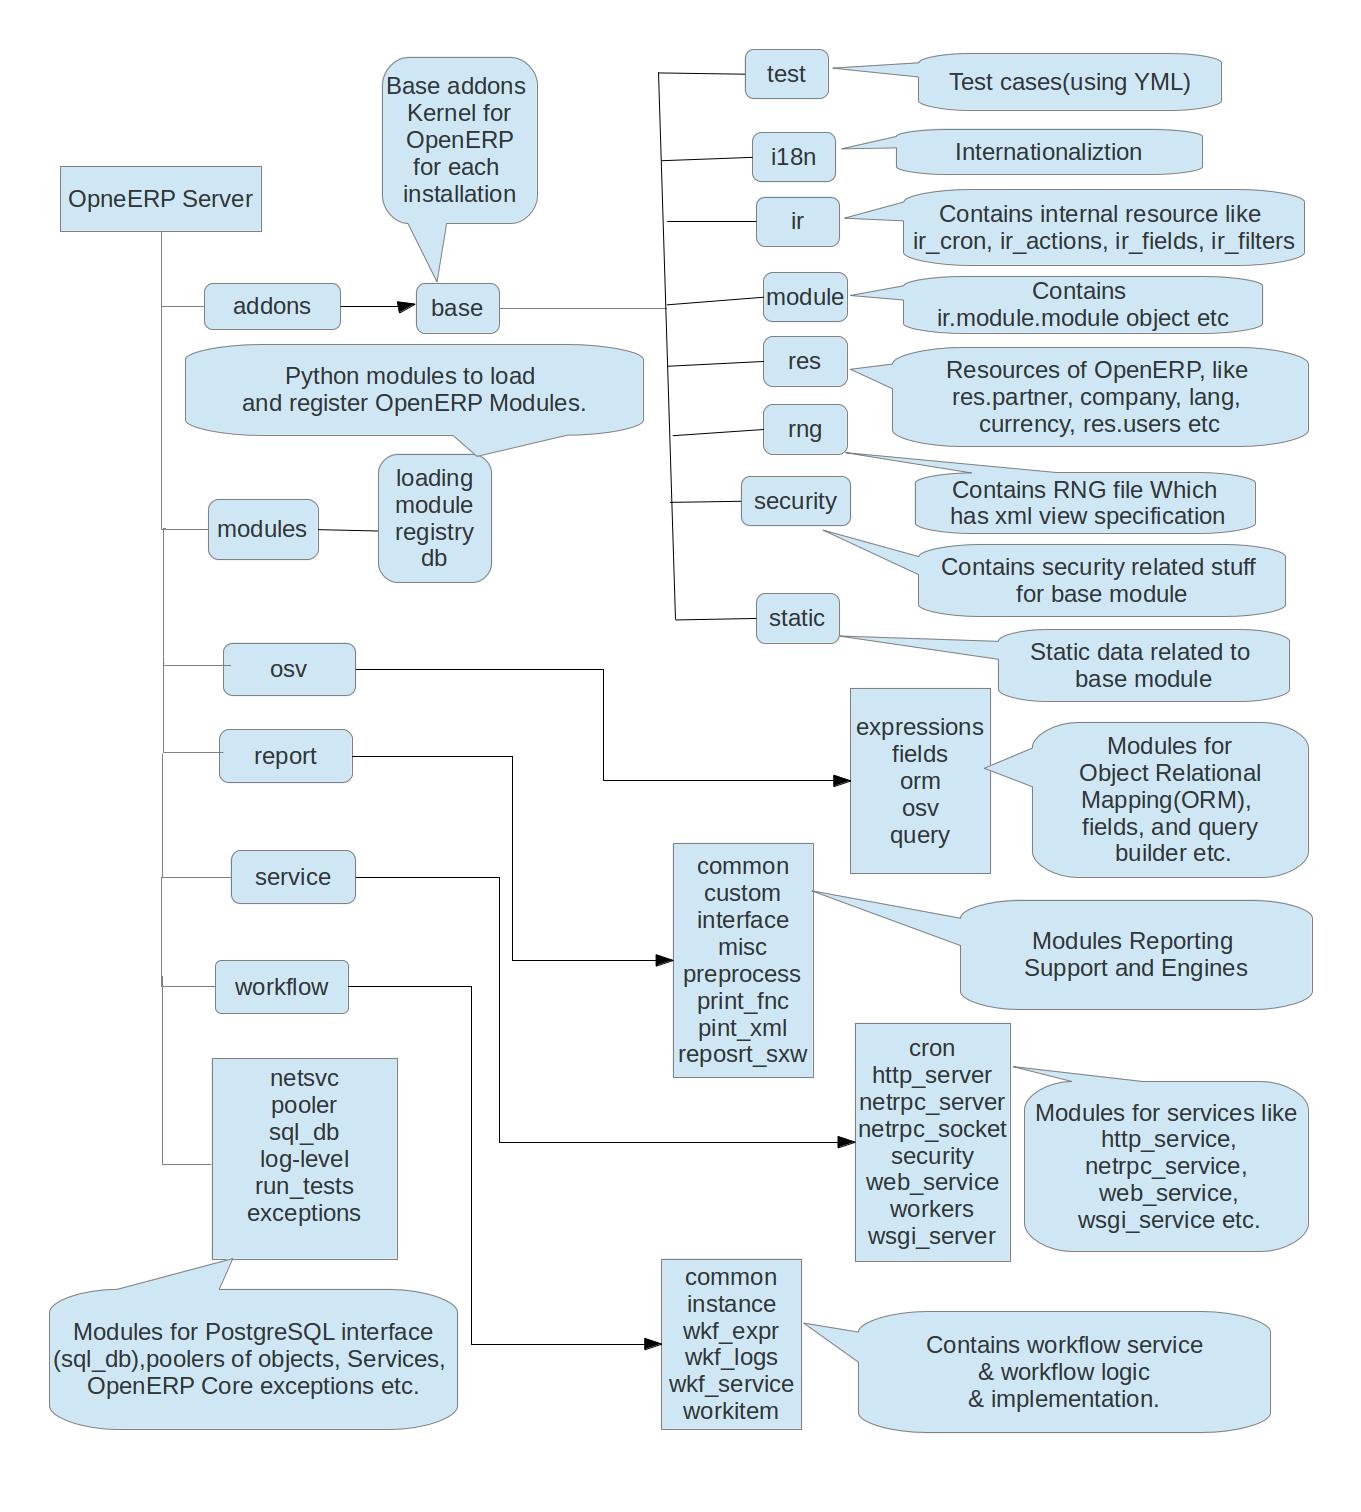
Before starting flow let's see directory structure for OpenERP Server Version 7.0, so that whenever I take some reference of module or method so you can have better idea.
Note :- OpenERP server now runs in Embedded mode only, so now when you run OpenERP server.py what process goes in background, openerp-server will call main method with command-line arguments, this main method will sets os environment, will check root user for POSIX system, parses config file where all options are stored by calling parse_config method(Parse the configuration file (if any) and the command-line arguments.), also checks postgres user(Exit if the configured database user is 'postgres'), will initalize logger, set babel path(Mainly user for internationalization), setup signal handler(need explanation), runs test files(YAML), it also setups pidfile this file contains process ids. this methos will also imports/exports the translation based on translate_in/translate_out option of config, Config file may have workers defined in it either statically defined in config file or from command line, so this main method will starts the OpenERP service with workers(to provide multi cron environment), if there is no worker defined the it starts the serivces simply(there is start_services_workers and start_services methods defined for this) .
Now its start_service which starts service of http, netrpc, and cron, following is the description regarding all this.
1. start internal:
start_internal method will initializes logger where log related OpenERP going to store, after that it will initiate object proxy, this object proxy will create a global object of self, so that object proxy service can be use globally(see init of object_proxy in osv.osv for detail), after starting and creating global object of objcet proxy service this will starts web service, the web service is the module which contains db, common, objects_proxy, report_spool classes, the start service method of web_service will creates instantiate this classes, the init methods of this classes will register their service with ExportService object, ExportService is a proxy class for exported service(as services of db, common and etc exported to it) this contains a dict of services so when we need to call particular service(i.e. particular object) we will call getService method of ExportService class.
Important Note :- This will also add openerp modules in sys.modules so that we can access our openerp modules .py file from anywhere by accessing sys.modules['openerp.module .py file']
After that this method will loads server wide modules by calling load_server_wide_modules, this method will read the addons path provided in config file or provided at terminal options(ultimately command line options are updates config file, see load_openerp_module method modules.modules).
load_openerp_module:// remain to write details
So in short the role of start_internal is to instantiate internal resource and export their service and load server modules.
2. netrpc server(service)
netrpc_server module has start_service method which starts netrpc service on specified domain and port, it instantiates TinySocketServerThread class.
TinySocketServerThread: it extends Threading and Server class. this will create main thread for netrpc interface, and initialize Server class(Here we mostly played with Threads for Server and socket instance).
Server class: // remain to write details
3. wsgi server
wsgi_server.start_service() will start the WSGI server,this is the point where WSGI(Web Server Gateway Interface) is initialized using werkzeug library, creates a thread of serve, serve will creates WSGI server by calling werkzeug.serving.make_server, as we have creates a separate thread for this so for each server we will create and instantiate separate thread which will server forever, make_server takes application as a parameter(application to serve), for fetch application we have application method, this application method will returns instance of application either with Proxy or without proxy(based on options given in config, there is --proxy-mode to run OpnERP behind proxy to run OpenERP behind apache proxy read http://mishekha.blogspot.in/2012/02/openerp-webclient-with-apache-reverse.html), there is application_unproxied method which returns application handler (Question why again openerp.service.start_internal() called internal services are already initialized in openerp.service.start_service()), there are list of handler as follow:
wsgi_xmlrpc_1 : //TODO
wsgi_xmlrpc : //TODO
wsgi_xmlrpc_legacy : //TODO
wsgi_webdav : //TODO
The above all are the handlers which handles every requests, request like for access common service, object service or access any method, all of the above calls xmlrpc_return method which calls dispatch_rpc method a common gateway method which handles each and every RPC calls and returns result which in turn returned as a response in str format, if dispatch_rpc fails it will gives exception,
there is method xmlrpc_handle_exception which handles all kind of xmlrpc exceptions.
Up to this we will have a WSGI server listening to our XMLRPC requests, now further we will see how any request initiated from web and how it is reaches to OpenERP Server and response given to client.
You will have question that how all modules are loaded and how web modules are loaded, so for this I will discuss load_openerp_module method of modules.modules.
4. cron
Note:- For threading you can refer
http://docs.python.org/2/library/threading.html#thread-objects
http://docs.python.org/2/library/threading.html
Start the above runner function in a daemon thread.
The thread is a typical daemon thread: it will never quit and must be
terminated when the main process exits.
The start service of cron module will create max_cron_threads(config option), by calling thread.Thread with target=cron_runner(Note:- cron will be a daemon thread as we have set t.setDaemon(True)),
We have set sleep interval to 60 seconds + number(index) of thread which is Steve Reich timing style that is first thread will have sleep time 61 second and second thread will have 62 and so on.
cron_runner :- this mainly checks for acquire job, This selects in database all the jobs that should be processed. It then tries to lock each of them and, if it succeeds, run the cron job (if it doesn't succeed, it means the job was already locked to be taken care of by another thread) and return.
In short this is basically cron module and cron_runner are responsible for run corn jobs by fetching from ir_cron model and runs it forever at particular interval.
If there is 60 cron threads then each one is wake up at the difference of 1 second as I discussed above time interval style of Steve Reich and at each second cron jobs got run.
Note :- Please share your views regarding the points in which you have better ideas.
Up to this We have seen how server starts, parse options and based on that options starts services as described above, now we will see how all modules got registered in pool(pool a directory of objects instances, with key as object name so when you get any object from pool like self.pool.get('some object') then you will have instance of that object and you can use datas and methods of that object) and how web is initialized.
As we already seen that start_internal of service module will call load_server_wide_modules, this method will read the addons path provided in config file or
provided at terminal options, as we have given server addons as well as web addons path from either terminal or in config file.
There will be web module always available to load in load_server_wide_modules because this is the module which is going to load always, whether user logged in or not, after login process, server will load database specific modules in which user logged in but web will always going to load, if you want some other modules to be pre-loaded then you can just set config setting or either you can give comma separated modules in terminal, -load is the option for it.
Note :- Let me clarify(as it is obvious) that loading of server addons is post procedure of login by default only web module is loaded, as user going to use web interface to interact with OpenERP.
This is the point where web module going to load
openerp.modules.module.load_openerp_module(m(web by default)) will load web module.
load_openerp_module :-Load an OpenERP module, if not already loaded. This loads the module and register all of its models, thanks to either the MetaModel metaclass, or the explicit instantiation of the model. This is also used to load server-wide module (i.e. it is also used when there is no model to register).
This method will find the path of module and imports it(See __import__ http://docs.python.org/2/library/functions.html(basically used to import modules whose name is known at runtime))
After importing this module this function will load all descriptions from manifest file(i.e.__openerp__.py or __terp__.py in old case), it will load all static files, xmls, demo files(all attributes of manifest file) by reading this file, after loading module and importing it it will appends it in
loaded gloabl variable.
Here noticable thing is how Root class of Web module is called, from where web module and WSGI dispatching comes into picture ?
load_openerp_module will read description and will find post_load
attribute in __openerp__.py(For reference see post_load in manifest file) and will call wsgi_postload method of http.py from server
itself.
getattr(sys.modules['openerp.addons.' + module_name], info['post_load'])()
This will read manifest file of web module and reads its info 'post_load' attribute,
'post_load' has value "wsgi_postload" and wsgi_postload is method of http.py in web module which calls openerp.wsgi.register_wsgi_handler(Root()) and gives Root class instance as a argument, this way web application handler instance is added to module registery in server.
So root path request will have a handler available, there will be a serving thread which serves to each and every request(as discussed earlier that server thread calls make_server of werkzeug WSGI and that thread serves forever) as application as handler, application handler is Root instance, so server will call call method of this handler instance from where actual web WSGI dispatched.
So each and every request is handled by appliation handler that is Root class of http.py this class represent as application because each and every request pass through this common gateway, the __call_ method of this claaa will call dispatch where actual dispatching of WSGI happens.
Upto this we have seen basic server process, how web module comes into picture, how application hanlder got registered, so from here we will see Trace of Web-Client how web handles each request, how it call http_request, json_request etc.
Let me give little bit glimpse on directory structure of Web-Client 7.0
As we have seen whenever we request from browser application handler will call dispatch(Actual dispatcher of WSGI), dispatch will analyse the request, its path and will call find_handler for that path, say for example if request path is '/' so handler will be index method of Home class of main controller(Please refer directory structure of Web-Client 7.0), this index method will return
html_template, html_template is :
html_template = """<!DOCTYPE html>
<html style="height: 100%%">
<head>
<meta http-equiv="X-UA-Compatible" content="IE=edge,chrome=1"/>
<meta http-equiv="content-type" content="text/html; charset=utf-8" />
<title>OpenERP</title>
<link rel="shortcut icon" href="/web/static/src/img/favicon.ico"
type="image/x-icon"/>
<link rel="stylesheet" href="/web/static/src/css/full.css" />
%(css)s
%(js)s
<script type="text/javascript">
$(function() {
var s = new openerp.init(%(modules)s);
%(init)s
});
</script>
</head>
<body>
<!--[if lte IE 8]>
<script src="http://ajax.googleapis.com/ajax/libs/chrome-frame/1/CFInstall.min.js"></script>
<script>CFInstall.check({mode: "overlay"});</script>
<![endif]-->
</body>
</html>
"""
and see signature of index method :
class Home(openerpweb.Controller):
_cp_path = '/'
@openerpweb.httprequest
def index(self, req, s_action=None, db=None, **kw):
js = "\n ".join('<script type="text/javascript" src="%s"></script>' % i
for i in manifest_list(req, 'js', db=db))
css = "\n ".join('<link rel="stylesheet" href="%s">' % i for i in
manifest_list(req, 'css', db=db))
r = html_template % {
'js': js,
'css': css,
'modules': simplejson.dumps(module_boot(req, db=db)),
'init': 'var wc = new s.web.WebClient();wc.appendTo($(document.body));'
}
return r
From here boot strap code is executed, see
openerp.init method called from html_template, for better understanding refer boot.js, this boot.js has openerp function which is loaded on document ready (for terms specification of javascript refer http://www.w3schools.com/), this boot.js will load all other classes and all other files, it will load "pyeval", "corelib", "coresetup", "dates", "formats", "chrome", "data", "views", "search", "list", "form", "list_editable", "web_mobile", "view_tree", "data_export", "data_import".
Very important Note :-
JavaScript doesn't have concept of inheritance, doesn't terms related to class etc but we have followed John Resig's inheritance architecure(Refer ejohn.org), each and every JS object will extends Widget class which in turn extends Class, the Class contains the core logic of constructor, extends, so if you extends Widget class so init method of that class will be automatically called(dummy constructor implementation),all this stuff is defined in corelib.js, so whenever we create any instance of object init method will automatically called, so init method is constructor in terms of OpenERP javascript framework, start method of class which extends openerp.web.widget will be called automatically, this is because of our implementation of corelib.
One more thing to note is that in JavaScript you can create an instance of function like:
helloWorld = function() {
alert("Hello World");
}
var hw = new helloWorld();
console.log(hw) //will gives object type
hw.constructor.apply() // will apply function helloWorld
Note:- boot class that is openerp has initialized all other instance, now see html_template given above, we have called s.web.WebClient(); where s is instance of OpenERP(see chrome.js).
Now further we will see, what Webclient object does, as I already described that when we create any instance of object it's init and start method automatically got called, and start method of Webclient(chrome.js) will check whether user is already logged in or not, if not then we render Login page otherwise will show application page.
For Weg-Client architecture(I'll update this post day by day) ---> To be continue ....
Note :- Kindly share your views/knowledge if you have better idea on topic described above

